




Decoupling Policies From Your Software With Open Policy Agent, Part 1

13 min read23.11.2020

Organizations operate in an ever-changing environment. These environmental changes for example include an introduction of a new law, technological progress, or even large-scale crises, such as the one we are experiencing right now. Organizations often need to react to these outside factors by updating their organizational policies. Many of these policies are implemented in software. Changes in policies can therefore lead to changes in code. These are often costly, time-consuming, and can make some services temporarily unavailable. Sound bad? Meet Open Policy Agent (OPA), an open-source policy engine that unifies policy enforcement across diverse technologies and systems.
The goal of OPA is to decouple policy definition and enforcement from other services. The authors of OPA define policy as “a set of rules that governs the behavior of a software service”. This definition covers authentication and authorization, but also many other enforced behaviors, such as:
- Telnet access should be forbidden on all company servers.
- Only signed Docker images can be deployed.
- A given service can only be deployed on a specific cluster.
- Server backups must happen at a specific time.
Although OPA is still quite new, it is already in various stages of adoption in at least 150 organizations.
How OPA Works
OPA is made of multiple components. First, the organization defines policies using a declarative language called REGO. This language is specifically designed to easily process complex nested JSON documents while also allowing the policy creator to focus on the definition instead of the implementation of its evaluation.
In REGO, each policy is defined as a set of rules—logical clauses that can be evaluated as being true or false. An example of a simple rule that checks if a user’s name is “Alice” and her role is set to “admin” could look like this:
allow_access {
  input.user.name == "Alice"
  input.user.role == "admin"
}
The second important component is the policy agent itself. It’s written in Go, and can be used as a command-line application, a Go library, or as an HTTP server. In all cases, the agent receives a JSON input, which is then evaluated against a set of rules defined in REGO. As we illustrate in the example above, you can access this input in the rules via the input variable.
A standalone policy agent lets you decouple policies from other services. Applications simply send a JSON input to evaluate and OPA answers with true or false.
In many cases, OPA might need external data to evaluate a rule. There are multiple ways of providing this additional context. The easiest way is to include everything the rule needs as part of the input. But, this solution doesn’t scale well. A better option is to use the data variable, which acts as a simple cache and can be filled through an HTTP API provided by OPA when running in server mode. Finally, REGO lets you make HTTP requests directly in the rule definition. Given the external source provides an HTTP API, this is the most flexible option.
Integrating OPA With Other Services
On an architectural level, there are many ways to integrate OPA into your service stack. We find the following two most useful.
1. OPA As Authentication Middleware
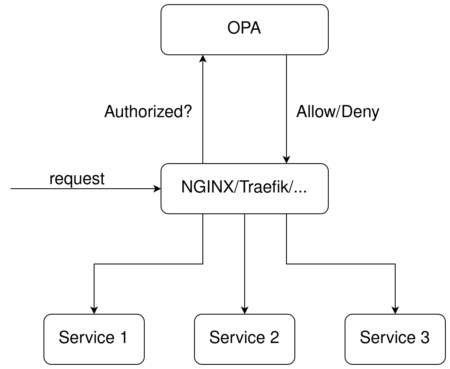
In this design, we consider multiple services that are accessed through an HTTP API gateway. Before redirecting the request to the actual service, the gateway first asks OPA if the service can be accessed given the attributes of the request. Attributes analyzed by OPA might include the HTTP method being used, the inclusion of an appropriate authentication token, the path being accessed, and many more. The requested service is contacted only if OPA verifies that the request complies with defined rules. One of the advantages of this approach is that much less traffic actually reaches the actual services, reducing the amount of required resources. The following diagram shows this workflow.
2. Services Communicate With OPA Directly
In many cases, it might be more beneficial for the services to communicate with OPA directly. One such scenario is when lists of database records have to be filtered so the users only see what they are authorized to see. This demo shows how OPA can be used to filter data returned by an SQL query.
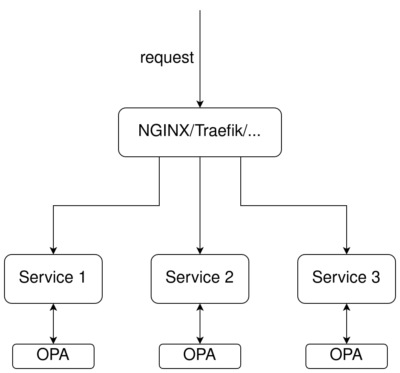
The aforementioned approaches are not mutually exclusive. They can be easily combined to create complex, multi-stage authentication and authorization processes that further enhance the security of your service stack.
REGO Examples
Let’s have a look at how we would define some policies in OPA for a specific use case. Consider a simple university course management system. Such a system has two basic groups of users: teachers and students. Teachers teach courses and students attend them. Each course has a weekly schedule determining when the classes actually take place.
To simplify this example, we will ignore some details like that there are multiple types of activities (lectures, laboratory exercises, etc.), or that we need to book a room for each class.
We will also assume that all required information is provided in the request or held in the data variable inside OPA. All operations in the system will be performed using a REST API.
You can try all rules described below yourself on Rego Playground.
1. User Authentication
Identity verification is probably one of the most important policies. To do so, we utilize JSON Web Tokens(JWT). OPA natively supports JWT decoding, which makes our lives a lot easier.
Following REGO rules can help us check the validity of the JWT token, and also verify that the user exists, and is either a student or a teacher:
user_is_student {
  data.users[token.payload.user].role == "student"
}

user_is_teacher {
  data.users[token.payload.user].role == "teacher"
}

token = {"payload": payload} {
  io.jwt.verify_hs256(input.jwt, "secret")
  [header, payload, signature] := io.jwt.decode(input.jwt)
}
Let’s start with the last rule. The io.jwt.verify_hs256 function lets us verify that the secret encoded in the token matches a predetermined value; in this case, “secret”. In the last row, we decode the token and create 3 variables containing the decoded values.
This rule is a bit special. Instead of simply returning true or false, it will behave like an object. As defined in the rule header, this object has one attribute named payload, containing the value of the payload variable created inside the rule; i.e., the payload retrieved from the JWT token.
Next, we have two rules verifying that a user is either a student or a teacher. We use the previously described data object to store a list of users. For easier access, this list is actually an object with each attribute representing one user like this:
"SMA001": {
  "course": [
    "CAL",
    "ML",
    "MiEco"
  ],
  "name": "Richard Small",
  "role": "student"
}
The attribute name is a unique user ID, and the value is an object describing the user.
Each of the two rules uses the token rule. Just mentioning the name automatically evaluates the rule for us. We expect that the payload attribute returned by the rule contains an object with a user attribute that stores the unique user ID. We can use this to find a specific user in our list, and check if the user’s role is indeed set to student or teacher.
The rules not only check the user’s role but also verify that the user actually exists. If no attribute whose name matches the value stored in token.payload.user is found in data.users, the rule simply returns false. This behavior is a bit different from other programming languages such as Python, where a missing dictionary key would result in an exception.
2. Only a Teacher Can Modify a Course
The following rule says that a course can be modified only by the teacher teaching that course. We also expect that modifications are being made using the PATCH method:
allow {
  input.method == "PATCH"
  input.path == "courses"
  teacher_teaching_course
}

teacher_teaching_course {
  user_is_teacher
  data.courses[input.course].teachers[_] == token.payload.user
}
Let’s first have a look at the teacher_teaching_course rule. First, we utilize the user_is_teacher rule defined above to verify the user’s identity. Next, we find the course whose ID is provided in the input.course attribute. Similar to data.users, data.courses contains an object with each attribute representing one course:
"CAL": {
  "credits": 5,
  "name": "Calculus",
  "teachers": [
    "PET001",
    "PAR001"
  ],
  "time_slot": [
    1,
    13
  ]
}
The subsequent part of the statement, .teachers[] == token.payload.user_, then checks if at least one item in the list of teachers matches the user ID provided in the JWT token.
In REGO, multiple statements in a single rule are implicitly grouped with logical conjunction; i.e. AND. In other words, the rule is evaluated as true only if all statements in that rule are true. In our case, teacher_teaching_course will return true only if the user is a teacher, AND their id is in the list of teachers for a given course.
Finally, we use the teacher_teaching_course rule as a part of the allow rule that checks that the HTTP request method is set to PATCH and the path in the URL is set to course.
3. A Student Can’t Have Two Classes At the Same Time
As shown above, each course has a predetermined list of time slots during which the classes actually take place. To simplify a bit, we represent each time slot by an integer. Time slot no. 1 can, for example, represent Monday at 9:00 a.m. – 10:00 a.m., while no. 40 refers to Friday at 4:00 p.m – 5:00 p.m. Some courses have multiple time slots assigned to them, and the student has to attend all of the associated activities.
In our system, we want to prevent a student from enrolling in a course if the enrollment would lead to a conflict in their schedule:
allow {
  input.method == "POST"
  input.path == "enroll"
  student_have_free_time_slot
}

student_have_free_time_slot {
  user_is_student
  not match_any_hours
}

match_any_hours {
  student_courses := data.users[token.payload.user].course
  student_timetable := data.courses[student_courses[_]].time_slot
  data.courses[input.course].time_slot[_] == student_timetable[_]
}
The match_any_hours rule is the most important part of the policy. For a given student, we retrieve the list of courses they are already enrolled in and store it in the student_courses variable. Next, we use this list of courses to get the list of all related time slots. Finally, we check if any of the time slots in the course the student wants to attend match any time slot related to courses in which the student has already enrolled. The rule returns true if a conflict is found.
The rule is then used inside student_have_free_time_slot, which also checks whether the user making the request is a student. Since we want to let the student enroll if there is no conflict, we also need to negate the value returned by match_any_hours. Finally, we add one more allow rule that also checks the HTTP method and URL path.
You have probably noticed that at this point we have 2 rules named allow. In REGO, this is absolutely fine. It is actually necessary if you want to implement an OR statement. The allow rule will return true if at least one of its definitions is evaluated as true. Additionally, we can set a default value for each rule:
default allow = false4. A Course Has a Maximum Student Capacity
The last rule lets a student enroll in a course only if there is still some capacity left. To make things a bit more interesting, the capacity of each course depends on the number of teachers teaching the course. In our example, there can be 20 students for each teacher in the course:
allow {
  input.method == "POST"
  input.path == "enroll"
  not course_is_full
}

course_is_full {
  course_capacity <= count(course_students_enrolled)
}

course_students_enrolled = students {
  students := [ st | (data.users[st].course[_] == input.course)]
}

course_capacity = capacity {
  no_teachers := count(data.courses[input.course].teachers)
  capacity := no_teachers * 20
}
This policy uses several REGO features we have not yet discussed. We use the count function to get the number of teachers in a course. The course_students_enrolled rule illustrates how we can create a list of all students attending a given course. The statement is similar to Python generators. We ask REGO to create a list of elements called st that match the ID of a student whose list of courses contains the ID of a course we are currently interested in. We could rewrite the rule in Python like this:
students = [st for st in data.users.keys()
            if input.course in  data.users[st].course]
Instead of true or false, both course_capacity and course_students_enrolled return a value of a variable defined inside the rule. Namely, they return the total capacity of a course and the list of students currently enrolled, respectively. These values are then used inside the course_is_full rule to check if there is still some free capacity in the course.
What’s Next?
In this article, we discussed what Open Policy Agent is, why and how it can be used in your service stack, and presented a simple use case. Defining rules and thinking about how we can integrate OPA on the architectural level is important, but not very useful until we actually let our services use it. So, in the next article, we will show you how OPA can be integrated into apps written in different programming languages.